# Qcells - HA

Depuis un moment je me dis qu’il est nécessaire de faire un petit post sur ce projet…

Commençons par bien décrire ce qui fonctionne aujourd’hui

J’ai acheté une maison en Juillet 2023 dans le sud de la France, elle était équipée d’une installation PV de marque QCells.

<span style="mso-no-proof: yes;">![](https://docs.mistrallabs.fr/uploads/images/gallery/2026-02/xSQ4XBL7x1RJMKyr-embedded-image-dqacwn9h.jpeg)</span>

Elle fonctionne correctement et remonte ses informations sur une console web chez le constructeur uniquement.

L’interface est très limitée et fermée…

<span style="mso-no-proof: yes;">![Une image contenant texte, capture d’écran, logiciel, Logiciel multimédia

Le contenu généré par l’IA peut être incorrect.](https://docs.mistrallabs.fr/uploads/images/gallery/2026-02/khdkexlJ4mQWmUr1-embedded-image-bjaeoe5y.png)</span>

Bref, ce n’est pas la solution que j’aurai choisie mais elle est la et je dois faire avec !

Cet onduleur QCells est connecté sur un compteur relié au tableau electrique via une liaison RS-485

<span style="mso-no-proof: yes;">![](https://docs.mistrallabs.fr/uploads/images/gallery/2026-02/VfunJ3F4mI9gqgzn-embedded-image-qwtldjlc.jpeg)</span>

L’onduleur adapte l’injection en fonction de la consommation de la maison et la production solaire.

Ainsi si la production PV est de 1000W, que la maison à besoin de 500W, il va aller compenser cette demande « EDF » en injectant autour de 500W pour essayer d’effacer « EDF » !

Ok, c’est bien beau tout ca, mais comment faire pour pouvoir l’intégrer dans une solution domotique ?!

Ma première étape sera donc de voir ce qu’il sera possible de faire pour récupérer un maximum d’informations depuis le dashboard « myess.hansoltechnics.com »

Une rapide recherche sur le net ne m’apporte rien de bon et je décide donc d’aller fouiller un peu s’il est possible d’avoir d’accès a une webui sur la carte LAN de l’onduleur QCells

Les ports 80, 443, 8080 ne répondent pas mais en recherchant un peu, google toujours notre ami, je tombe sur un poste allemand qui parle d’un accès à l’interface BMS sur le port 21710 !

Aller, on va aller voir ça bingo !

L’interface du BMS !

<span style="mso-no-proof: yes;">![](https://docs.mistrallabs.fr/uploads/images/gallery/2026-02/2spzwM5n0U8WXlMo-embedded-image-iajf7pih.png)</span>

On fouille un peu dans les menus sans aller sur les parties de configuration, on se contente de la page de monitoring<span style="mso-no-proof: yes;">![](https://docs.mistrallabs.fr/uploads/images/gallery/2026-02/NQ5Mu3ncxCItU3IC-embedded-image-mh6a27kg.png)</span>

Effectivement on a bien plus de chose et si on va dans \[More data\] encore plus !

<span style="mso-no-proof: yes;">![](https://docs.mistrallabs.fr/uploads/images/gallery/2026-02/J6i8jcpxBigrnBSF-embedded-image-n62pb2ze.png)</span>

La ca parle, GRID, PV, LOAD, c’est les valeurs qu’il me faut !

Etant équipe d’une solution Home Assistant avec un Lixee sur la prise TIC, je constate que les valeurs sont bien cohérentes.

On va donc voir comment faire pour récupérer ses valeurs et les injecter dans Home Assistant pour les utiliser.

Pour cela, j’ai décidé de venir parser la page en question à intervalle régulier pour en extraire les informations d’on j’ai besoin.

Ca tombe bien, j’ai un Rasbperry qui ne sert à rien dans un coin !

N’etant pas super alaise avec certain language et connaissant un peu PHP, j’ai décidé de créer un script assez simple.

J’extrairai les informations de la page de l’onduleur et les injecterai via MQTT dans Home Assistant.

Etape 1 – Récupérer la page dans mon script :

Je charge ma page onduleur :

<p class="callout info"><span style="font-family: 'Courier New';">// URL de la page web  
</span><span style="font-family: 'Courier New';">$url = 'http://10.105.10.1:21710/f0';  
</span><span style="font-family: 'Courier New';">$html = file\_get\_contents($url);  
</span><span style="font-family: 'Courier New';">if (!$html) {  
</span><span style="font-family: 'Courier New';"> die("</span><span style="font-family: 'Segoe UI Emoji',sans-serif; mso-bidi-font-family: 'Segoe UI Emoji';">❌</span><span style="font-family: 'Courier New';"> Impossible de charger la page web !");  
</span><span style="font-family: 'Courier New';">}</span></p>

Etape 2 - Extraction des données

<p class="callout info"><span style="font-family: 'Courier New';">// Extraction des valeurs  
</span><span style="font-family: 'Courier New';">$data = \[\];  
</span><span style="font-family: 'Courier New';">preg\_match('/GRID\_P.\*?(-?\\d+\[\\.,\]?\\d\*)/', $html, $matches);  
</span><span style="font-family: 'Courier New';">$data\['grid'\] = $matches\[1\] ?? "N/A";  
  
</span><span style="font-family: 'Courier New';">preg\_match('/LOAD\_P.\*?(-?\\d+\[\\.,\]?\\d\*)/', $html, $matches);  
</span><span style="font-family: 'Courier New';">$data\['load\_p'\] = $matches\[1\] ?? "N/A";  
  
</span><span style="font-family: 'Courier New';">preg\_match('/PV\_P.\*?(-?\\d+\[\\.,\]?\\d\*)/', $html, $matches);  
</span><span style="font-family: 'Courier New';">$data\['pv\_prod'\] = $matches\[1\] ?? "N/A";  
  
</span><span style="font-family: 'Courier New';">preg\_match('/BT\_SOC.\*?(\\d+)/', $html, $matches);  
</span><span style="font-family: 'Courier New';">$data\['batt\_lvl'\] = $matches\[1\] ?? "N/A";  
  
</span><span style="font-family: 'Courier New';">preg\_match('/BT\_P.\*?(-?\\d+\[\\.,\]?\\d\*)/', $html, $matches);  
</span><span style="font-family: 'Courier New';">$data\['battery\_charge'\] = $matches\[1\] ?? "N/A";  
  
</span><span style="font-family: 'Courier New';">preg\_match('/INV\_P.\*?(-?\\d+\[\\.,\]?\\d\*)/', $html, $matches);  
</span><span style="font-family: 'Courier New';">$data\['inverter\_p'\] = $matches\[1\] ?? "N/A";  
  
</span><span style="font-family: 'Courier New';">preg\_match('/&lt;td width=80&gt;SYS\_READY&lt;\\/td&gt;\\s\*&lt;td width=20&gt;(\\d+)&lt;\\/td&gt;/', $html, $matches);  
</span><span style="font-family: 'Courier New';">$data\['SYS\_READY'\] = $matches\[1\] ?? "N/A";  
  
</span><span style="font-family: 'Courier New';">preg\_match('/&lt;td width=80&gt;SYS FAULT&lt;\\/td&gt;\\s\*&lt;td width=20&gt;(\\d+)&lt;\\/td&gt;/', $html, $matches);  
</span><span style="font-family: 'Courier New';">$data\['SYS\_FAULT'\] = $matches\[1\] ?? "N/A";  
  
</span><span style="font-family: 'Courier New';">preg\_match('/PV\_run.\*?(\\d+)/', $html, $matches);  
</span><span style="font-family: 'Courier New';">$data\['PV\_run'\] = $matches\[1\] ?? "N/A";  
  
</span><span style="font-family: 'Courier New';">preg\_match('/BT\_CH\_run.\*?(\\d+)/', $html, $matches);  
</span><span style="font-family: 'Courier New';">$data\['BT\_CH\_run'\] = $matches\[1\] ?? "N/A";  
  
</span><span style="font-family: 'Courier New';">preg\_match('/BT\_DIS\_run.\*?(\\d+)/', $html, $matches);  
</span><span style="font-family: 'Courier New';">$data\['BT\_DIS\_run'\] = $matches\[1\] ?? "N/A";</span></p>

En détail :  
\- GRID\_P : La puissance en provenance d’EDF (W)  
\- LOAD\_P : La puissance demandée par la maison (W)  
\- PV\_P : La puissance produite par les PV (W)  
\- BT\_SOC : Le niveau de charge de la batterie QCells (%)  
\- BT\_P : La puissance entrant/sortant de la batterie QCells (W)  
\- INV\_P : La puissance envoyée en sortie du système QCells (W)  
\- SYS\_READY : Etat du système QCells (1 ou 0)  
\- SYS\_FAULT : La présence d’un defaut sur le système QCells (1 ou 0)  
\- PV\_run : Production PV active ou non (1 ou 0)  
\- BT\_CH\_run : Charge Batterie activée (1 ou 0)  
\- BT\_DIS\_run Décharge de Batterie activée (1 ou 0)

Etape 3 – Traitement et injections des données dans HA

Pour cela, j’utilise l’addon php MQTT.

<p class="callout info">  
<span style="font-family: 'Courier New';">require 'vendor/autoload.php';<span style="mso-spacerun: yes;"> </span>// Charge Bluerhinos\\phpMQTT  
</span><span style="font-family: 'Courier New';">use Bluerhinos\\phpMQTT;  
  
</span><span style="font-family: 'Courier New';">// Configuration MQTT  
</span><span style="font-family: 'Courier New';">$server = "10.105.1.16";  
</span><span style="font-family: 'Courier New';">$port = 1883;  
</span><span style="font-family: 'Courier New';">$username = "mqtt";  
</span><span style="font-family: 'Courier New';">$password = "mqtt";  
</span><span style="font-family: 'Courier New';">$client\_id = "qcells\_mqtt\_client";</span></p>

On commence simple, on va injecter le statu du QCells, est-il en charge, décharge, standby ?

<p class="callout info"><span style="font-family: 'Courier New';">// Déterminer l'état de charge/décharge  
</span><span style="font-family: 'Courier New';">if ($data\['BT\_CH\_run'\] == 1 &amp;&amp; $data\['BT\_DIS\_run'\] == 0)<span style="mso-spacerun: yes;"> </span>$data\['etat'\] = "En charge";  
</span><span style="font-family: 'Courier New';">if ($data\['BT\_CH\_run'\] == 0 &amp;&amp; $data\['BT\_DIS\_run'\] == 1) $data\['etat'\] = "En décharge";  
</span><span style="font-family: 'Courier New';">if ($data\['BT\_CH\_run'\] == 0 &amp;&amp; $data\['BT\_DIS\_run'\] == 0) $data\['etat'\] = "Standby";</span></p>

<span style="font-family: 'Courier New';"> </span>

Et on envoi ca dans Home Assistant

On va donc se connecter au MQTT

<p class="callout info">// Création du client MQTT  
$mqtt = new phpMQTT($server, $port, $client\_id);  
if (!$mqtt-&gt;connect(true, NULL, $username, $password)) {  
<span style="mso-spacerun: yes;"> </span>die("<span style="font-family: 'Segoe UI Emoji',sans-serif; mso-bidi-font-family: 'Segoe UI Emoji';">❌</span> Échec de connexion au broker MQTT !");  
}</p>

On créé notre device

<p class="callout info">// Identifiant du device (Qcells)  
$device\_id = "qcells";  
  
// Informations sur l'onduleur solaire (Qcells)  
$device\_info = \["identifiers" =&gt; \[$device\_id\], "name" =&gt; "Qcells", "model" =&gt; "Hybrid Inverter", "manufacturer" =&gt; "Qcells", "via\_device" =&gt; "MQTT"\];</p>

On créé notre « sensor »

<p class="callout info">// Définition des capteurs MQTT Discovery  
$sensors = \[  
<span style="mso-spacerun: yes;"> </span>"etat" =&gt; \["name" =&gt; "État", "device\_class" =&gt; "enum", "state\_class" =&gt; "measurement", "icon" =&gt; "mdi:battery-sync"\],  
\];</p>

Et enfin on publie tout ca sur Home Assistant

<p class="callout info">// Publier chaque capteur avec MQTT Discovery  
foreach ($sensors as $key =&gt; $sensor) {  
<span style="mso-spacerun: yes;"> </span>$discovery\_topic = "homeassistant/sensor/{$device\_id}\_{$key}/config";  
<span style="mso-spacerun: yes;"> </span>$discovery\_payload = json\_encode(\[  
<span style="mso-spacerun: yes;"> </span>"name" =&gt; $sensor\["name"\],  
<span style="mso-spacerun: yes;"> </span>"state\_topic" =&gt; "homeassistant/sensor/qcells",  
<span style="mso-spacerun: yes;"> </span>"value\_template" =&gt; "{{ value\_json.$key }}",  
<span style="mso-spacerun: yes;"> </span>"unit\_of\_measurement" =&gt; $sensor\["unit\_of\_measurement"\] ?? NULL,  
<span style="mso-spacerun: yes;"> </span>"device\_class" =&gt; $sensor\["device\_class"\],  
<span style="mso-spacerun: yes;"> </span>"state\_class" =&gt; $sensor\["state\_class"\],  
<span style="mso-spacerun: yes;"> </span>"icon" =&gt; $sensor\["icon"\],  
<span style="mso-spacerun: yes;"> </span>"unique\_id" =&gt; "{$device\_id}\_{$key}",  
<span style="mso-spacerun: yes;"> </span>"device" =&gt; $device\_info  
<span style="mso-spacerun: yes;"> </span>\]);  
<span style="mso-spacerun: yes;"> </span>$mqtt-&gt;publish($discovery\_topic, $discovery\_payload, 0);  
}  
  
// Publication des données JSON à MQTT  
$mqtt-&gt;publish("homeassistant/sensor/qcells", json\_encode($data), 0);  
$mqtt-&gt;close();</p>

Des lors, une nouvelle entité est créée sous Home Assistant
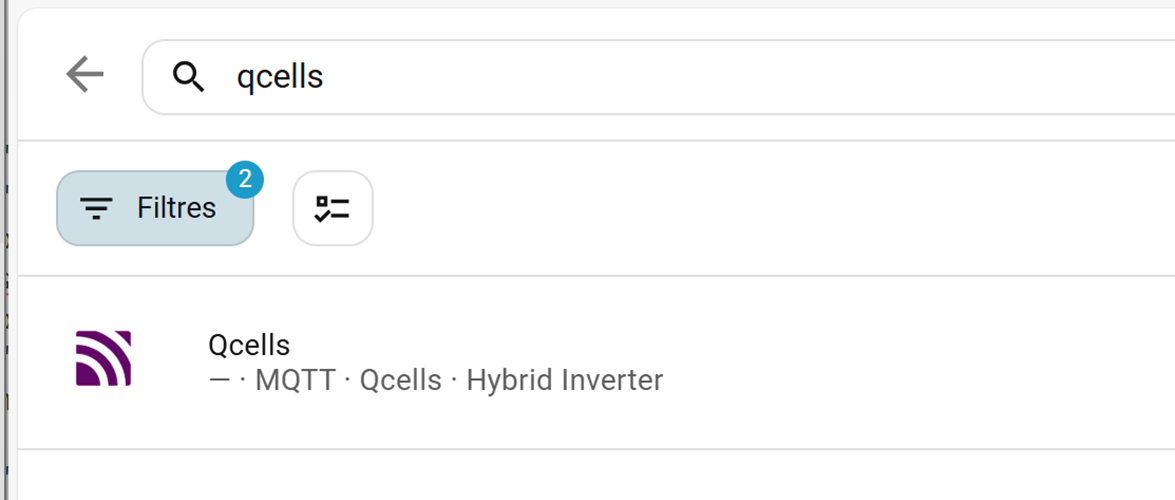
<span style="mso-no-proof: yes;">![Une image contenant texte, capture d’écran, Police, ligne

Le contenu généré par l’IA peut être incorrect.](https://docs.mistrallabs.fr/uploads/images/gallery/2026-02/BoCuFfvKIfG94Rzb-embedded-image-vpiq17o3.png)</span>

Avec dedans notre etat !  
<span style="mso-no-proof: yes;">![](https://docs.mistrallabs.fr/uploads/images/gallery/2026-02/KswNVvWXHfgLof5y-embedded-image-oblwvrjl.png)</span>

Impeccable tout ça on va pouvoir s’attaquer à la suite !

On va donc ajouter dans section « Définition des capteurs MQTT Discovery » tout ce dont nous avons besoin et qui ne nécessite pas de calcul avancé.

On ajoute donc, le niveau de la batterie, la puissance demandée à EDF, la puissance demandée par la maison, la puissance en sortie des PV, la puissance en sortie du QCells, etc…

<p class="callout info"><span style="font-family: 'Courier New';"><span style="mso-spacerun: yes;"> </span>"batt\_lvl" =&gt; \["name" =&gt; "Niveau Batterie", "unit\_of\_measurement" =&gt; "%", "device\_class" =&gt; "battery", "state\_class" =&gt; "measurement", "icon" =&gt; "mdi:battery"\],</span></p>

<p class="callout info"><span style="font-family: 'Courier New';"><span style="mso-spacerun: yes;"> </span>"pv\_prod" =&gt; \["name" =&gt; "Production Solaire", "unit\_of\_measurement" =&gt; "W", "device\_class" =&gt; "power", "state\_class" =&gt; "measurement", "icon" =&gt; "mdi:solar-power"\],</span></p>

<p class="callout info"><span style="font-family: 'Courier New';"><span style="mso-spacerun: yes;"> </span>"inverter\_p" =&gt; \["name" =&gt; "Inverter Production", "unit\_of\_measurement" =&gt; "W", "device\_class" =&gt; "power", "state\_class" =&gt; "measurement", "icon" =&gt; "mdi:solar-power"\],</span></p>

<p class="callout info"><span style="font-family: 'Courier New';"><span style="mso-spacerun: yes;"> </span>"battery\_charge" =&gt; \["name" =&gt; "Charge Batterie", "unit\_of\_measurement" =&gt; "W", "device\_class" =&gt; "power", "state\_class" =&gt; "measurement", "icon" =&gt; "mdi:battery-charging"\],</span></p>

<p class="callout info"><span style="font-family: 'Courier New';"><span style="mso-spacerun: yes;"> </span>"grid" =&gt; \["name" =&gt; "Consommation Réseau", "unit\_of\_measurement" =&gt; "W", "device\_class" =&gt; "power", "state\_class" =&gt; "measurement", "icon" =&gt; "mdi:transmission-tower"\],</span></p>

<p class="callout info"><span style="font-family: 'Courier New';"><span style="mso-spacerun: yes;"> </span>"load\_p" =&gt; \["name" =&gt; "Consommation Maison", "unit\_of\_measurement" =&gt; "W", "device\_class" =&gt; "power", "state\_class" =&gt; "measurement", "icon" =&gt; "mdi:transmission-tower"\],</span></p>

<p class="callout info"><span style="font-family: 'Courier New';"><span style="mso-spacerun: yes;"> </span>"etat" =&gt; \["name" =&gt; "État", "device\_class" =&gt; "enum", "state\_class" =&gt; "measurement", "icon" =&gt; "mdi:battery-sync"\],</span></p>

<p class="callout info"><span style="font-family: 'Courier New';"><span style="mso-spacerun: yes;"> </span>"dernier\_releve" =&gt; \["name" =&gt; "Dernier relevé", "unit\_of\_measurement" =&gt; "", "device\_class" =&gt; "enum", "state\_class" =&gt; "measurement", "icon" =&gt; "mdi:calendar-clock"\],</span></p>

<p class="callout info"><span style="font-family: 'Courier New';"><span style="mso-spacerun: yes;"> </span>"SYS\_READY" =&gt; \["name" =&gt; "Système Prêt", "unit\_of\_measurement" =&gt; "", "device\_class" =&gt; "enum", "state\_class" =&gt; "measurement", "icon" =&gt; "mdi:check-circle"\],</span></p>

<p class="callout info"><span style="font-family: 'Courier New';"><span style="mso-spacerun: yes;"> </span>"SYS\_FAULT" =&gt; \["name" =&gt; "Fautes Système", "unit\_of\_measurement" =&gt; "", "device\_class" =&gt; "enum", "state\_class" =&gt; "measurement", "icon" =&gt; "mdi:alert-circle"\],</span></p>

<p class="callout info"><span style="font-family: 'Courier New';"><span style="mso-spacerun: yes;"> </span>"etat\_pv" =&gt; \["name" =&gt; "Status PV", "unit\_of\_measurement" =&gt; "", "device\_class" =&gt; "enum", "state\_class" =&gt; "measurement", "icon" =&gt; "mdi:solar-power"\]</span></p>

Et donc dans Home Assistant, ca remonte également !

<span style="mso-no-proof: yes;">![Une image contenant texte, capture d’écran, nombre, logiciel

Le contenu généré par l’IA peut être incorrect.](https://docs.mistrallabs.fr/uploads/images/gallery/2026-02/spYtoxhthjME8iBB-embedded-image-xq6qynyh.png)</span>

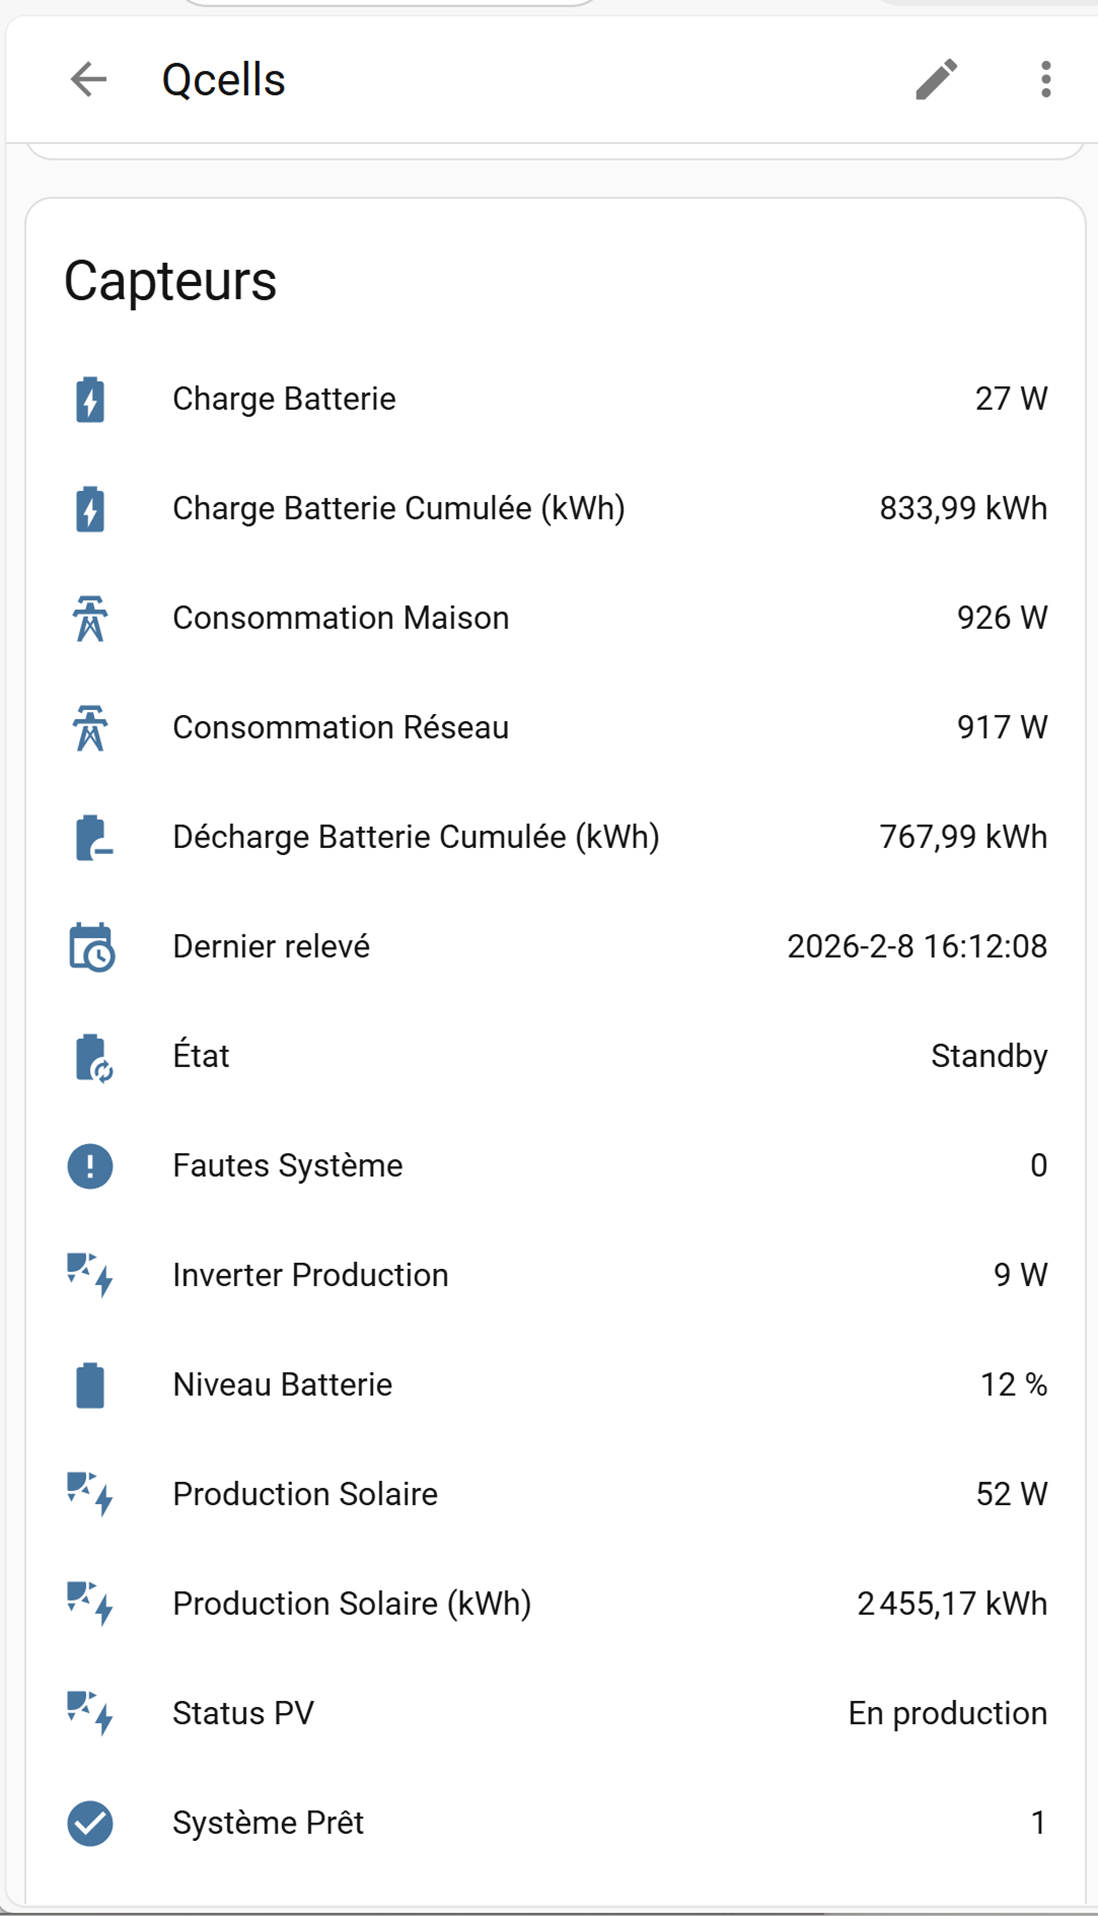
Il ne reste plus qu’a exécuter ce script toutes les 10 secondes à l’aide de cron sous linux !

Et voila, on a notre QCells qui est maintenant interfacé avec Home Assistant :D

Alors vous me direz, oui mais dans ta capture y a des valeurs en kwh !

Et bien oui on y vient, pour calculer la production solaire en kWh, l’interface du QCells ne me le dit pas, il faut que je le calcule.

On a une valeur à un instant T et je vais extrapoler cela pour 10 secondes :

On part du principe que je produis 1000W par seconde sur une durée de 10 secondes donc 1000W x 10sec : 10000W

Maintenant pour les avoir en Wh, je divise le tout par 3600 (60 secondes \* 60 minutes = 3600)

Mais moi, il me faut des kWh pas des Wh !

Donc je redivise le tout par 1000, soit 3600000 !

Pour être précis, je vais arrondir le résultat à 4 chiffres derrière la virgule à l’aide de fonction php round()

<p class="callout info">// Calcul de la production en kWh (converti depuis W sur 10s)  
$production\_kwh = ($data\['pv\_prod'\] \* 10) / 3600000;  
$data\['pv\_prod\_kwh'\] = round($production\_kwh, 4);</p>

Et voilà, j’ai ma production en kwh !

On vérifie quand même si c’est cohérant

Depuis le portail QCells, j’ai pour Janvier :

Et depuis Home Assistant (en jaune, les autres on y viendra plus tard) :

<span style="mso-no-proof: yes;">![Une image contenant capture d’écran, texte, diagramme, ligne

Le contenu généré par l’IA peut être incorrect.](https://docs.mistrallabs.fr/uploads/images/gallery/2026-02/oyOXDlWqkoDhXXIM-embedded-image-6h4fmjnn.png)</span>

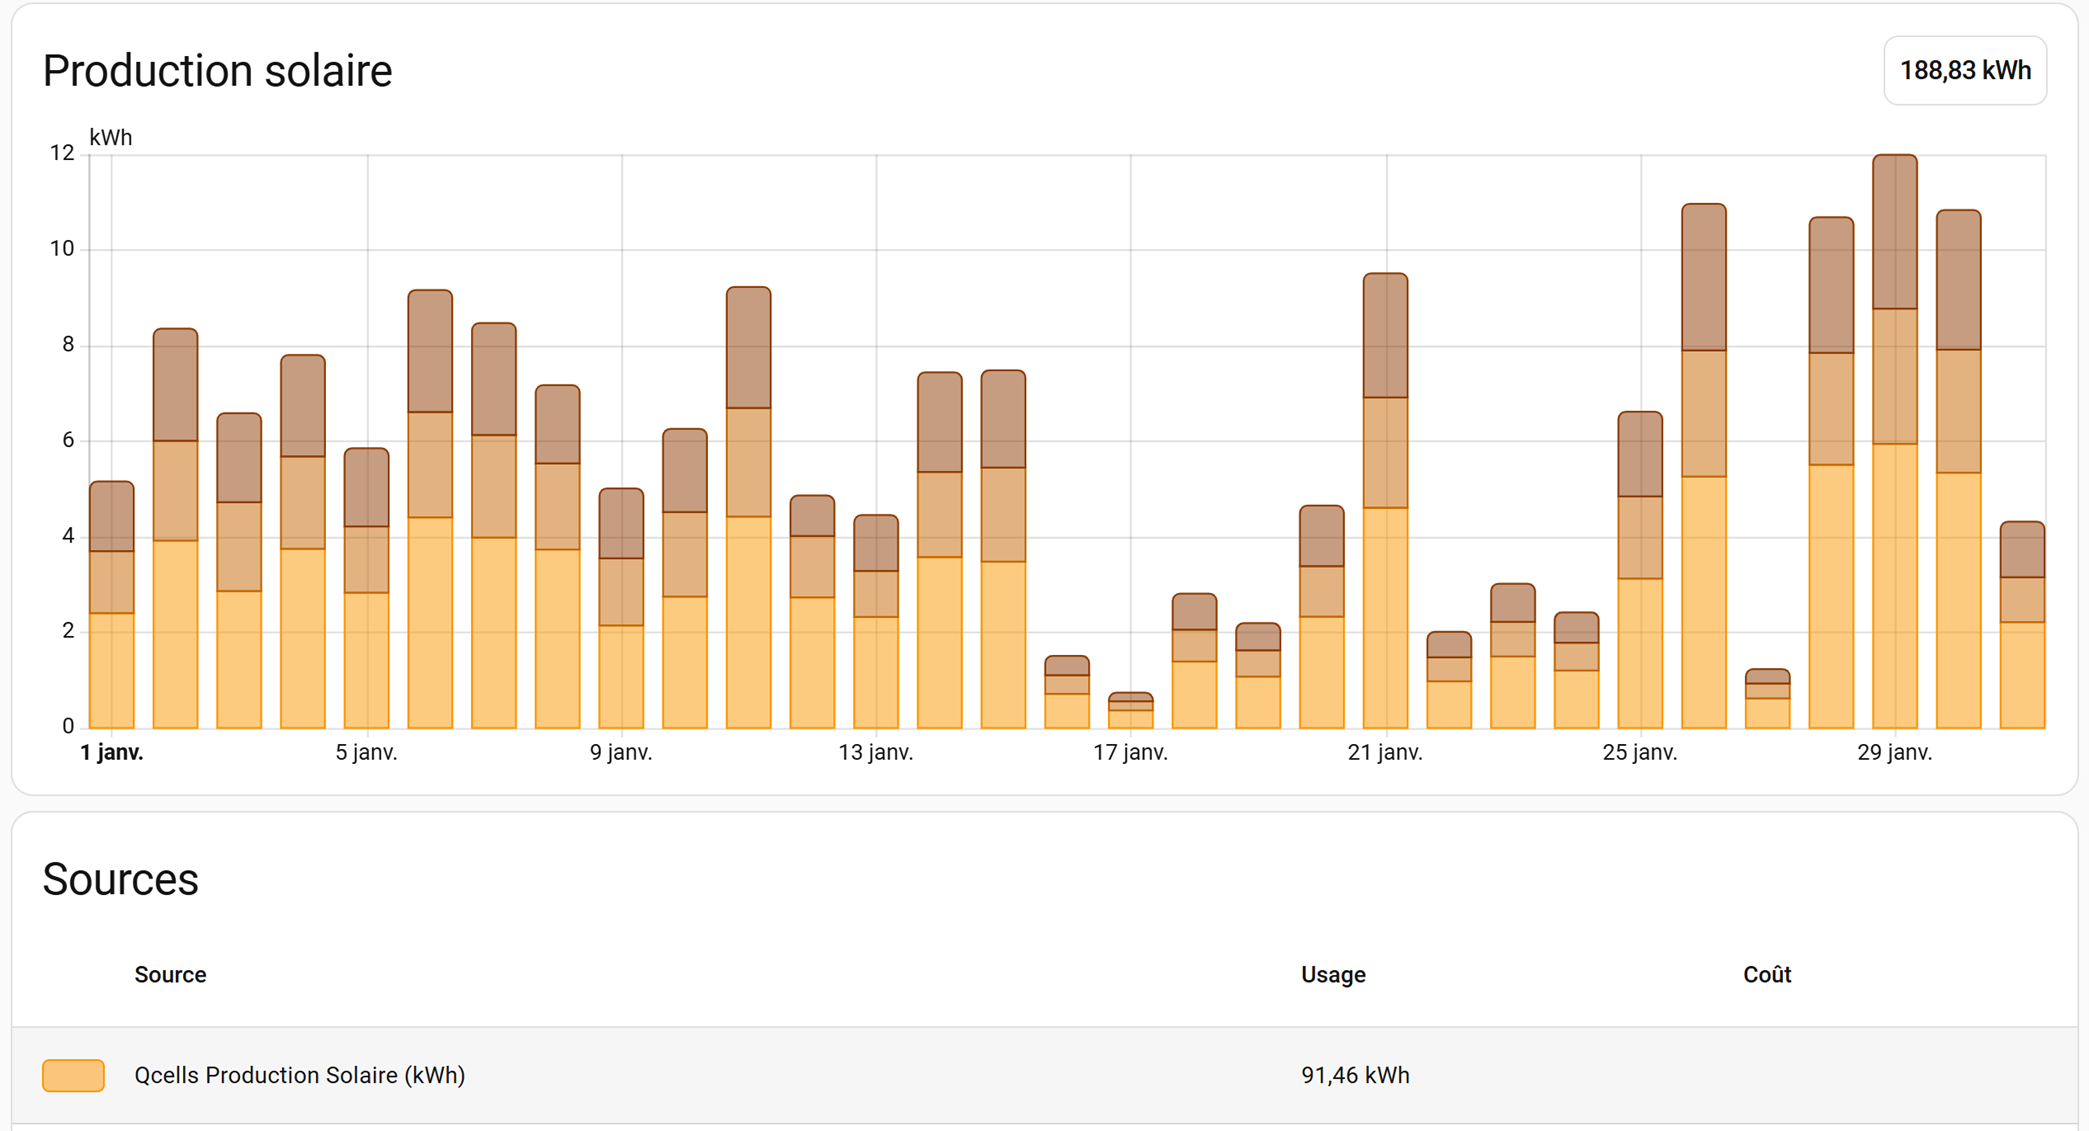
Et depuis le portail QCells

<span style="mso-no-proof: yes;">![Une image contenant texte, capture d’écran, Police, nombre

Le contenu généré par l’IA peut être incorrect.](https://docs.mistrallabs.fr/uploads/images/gallery/2026-02/mmkDw3LSRldgS2Ak-embedded-image-m10nvml9.png)</span>

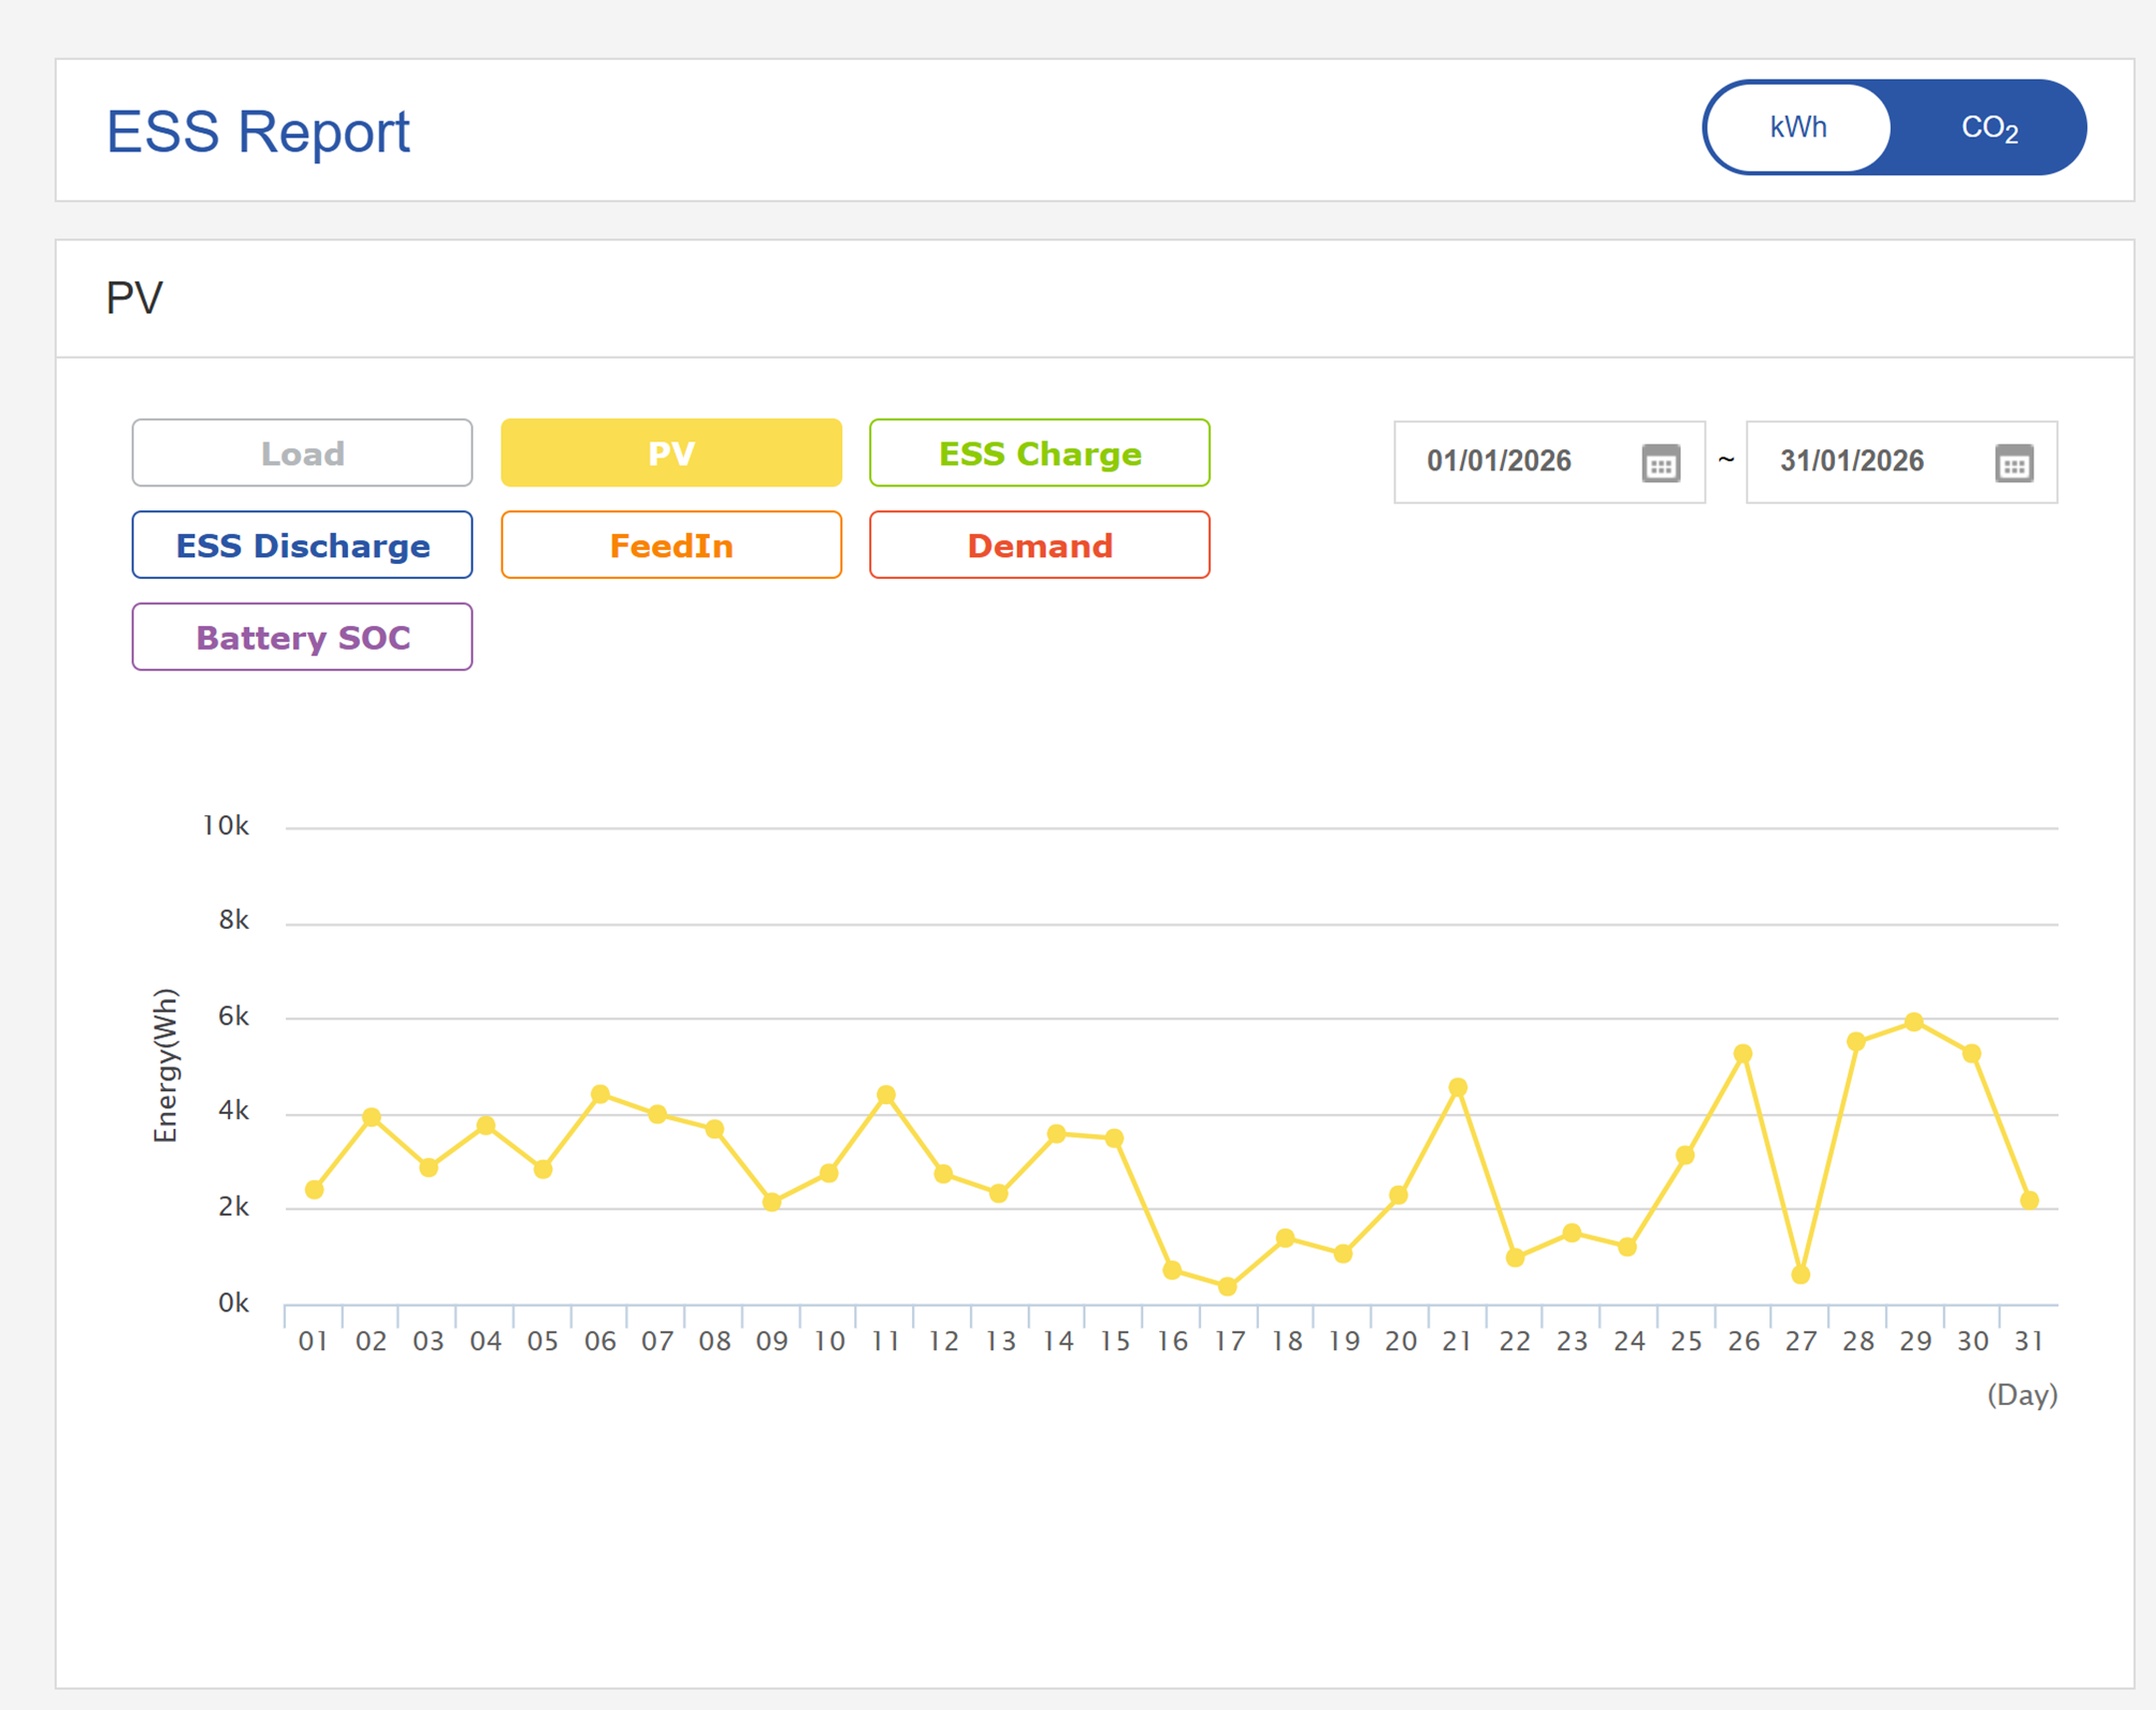
Les valeurs sont IDENTIQUES !

Sur janvier 2026, HA me remonte une production de 91,46kWh et le dashboard Qcells 91,06kWh

Pourquoi un écart de 400Wh ?  
Simple, il est arrivé que l’onduleur n’est pas réussi à envoyer des informations sur MyESS à certain moment (perte d’accès internet ou autre) alors que mon HA est en local et hautement disponible.

Pour les autres valeurs en kWh, il ne vous reste plus qu’a faire pareil selon vos envies !

J’espère que cela aura été utiles à ceux disposant d’un système solaire QCells et qui souhaite l’intégrer dans une solution domotique tel qu’Home Assistant